Showing posts with label learn blogger. Show all posts

2009-04-08

Image

Custom search engine on your Blogger template

how to add the same search engine form I added on my Blogger Template. You only have to add these lines of code on your template changing the form action URL with the URL of your site:


The input hidden field "max results" set the number of results you want to display on your page after a search.

Here

I set it to 4 but you can change it how you prefer. I suggest don't use a number greater than 10 post for page otherwise the results page will be loaded slowly.
Image

Verify your Blogger Blog in Google Webmaster without adding Meta Tags


Although verifying the blogger blog at Google Webmaster Central is not very hard task, but sometimes adding META tag verifier in blogger’s html code causes problem and doesn’t get verified easily.

Well, it is not any trick or secret on how to verify blogger blog without adding Meta tags. It’s just a normal way that i found in my blogger account.

How to do that?

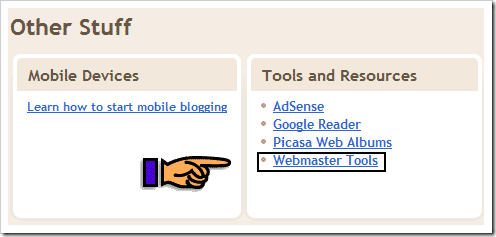
At the footer of dashboard of your blogger account you’ll find “Other Stuff” section as shown below.

3rb-game blogger

Click on Webmaster Tools link, after that you’ll will be taken to a new page.

Enable Webmater for Blogger

Enable Webmaster Tools from there.

After completing the above steps, you successfully complete verification of your blog in Google Webmaster Central. And in future whenever you create a new blog with the same Google account it then automatically will get added to Google Webmaster Central.

Now there is one more issue that causes problem in Google Webmaster Central, i.e  adding Sitemap. All you have to do is to add atom feed address without redirection to any other feed.

Here is an example of that:  www.example.com/atom.xml?redirect=false

Atom Feed as Sitemap

Posted by Anurag Tripathi at 7:46 PM

Bookmark and Share

Labels: google

IceRocket Tags:
IceRocket Tags:
Image

Add Search Bar For Blogger Blogspot


The Google Navigation bar at the top of your Blogger blogs has an embedded search box. However, you may want to include a similar box in the main body of your blog (like what I have done), or the sidebar. Other than the convenience for users, the added advantage is that unlike Google search box, the search results of this Blogger.com search box appear in the main body of your Blog.
Under Template->Page Elements tab, click “Add a Page Element” at the place where you want your search box to appear. Select “HTML/JavaScript”.
There are several HTML codes posted on the net. I tried a few, and found the one that works as follows:-

<p align="left">
<form id="searchthis" action="YOUR BLOG URL/search" style="display:inline;" method="get">
<strong>NAME OF YOUR BLOG<br/></strong>
<input id="b-query" maxlength="255" name="q" size="20" type="text"/>
<input id="b-searchbtn" value="Search" type="submit"/>
</form></p>

Remember to change YOUR BLOG URL to the URL or web address of your Blog. Also, change the NAME OF YOUR BLOG to that which you want to call your site. For instance, if your Blog Name is long, you may want to write something like “Search Here” or “Search this site”.
You can also change the “Search” button to say, “Hit” or “Go”, by changing the Value.
Save the code and refresh your page. If you want a longer or shorter search box, you can play around with the size. The above example of a width size="20" and value="Hit" will give you this:-

Search Here

Whereas a width size="30" and value="Go" will give you this:-

Search Here

The size of the search box is a matter of appearance. You may have noticed that the maxlength="255". This indicates that a user may enter up to 255 characters in the search box, which I think is sufficient and need not be altered.
Image instead of Search button

Search Tips for New Bloggers

Just for the fun of it, if you want readers to click an image instead of a button, you will first need to do up a small picture. You can also resize a picture you already have with photo editing tools like Google's Picasa. After creating a picture, upload it onto a free server like GooglePages or Google Groups, or other free hosts that offer direct links to the image files. Take note of this IMAGE URL.
The HTML code to insert is this:-

<p align="left">
<form id="searchthis" action="YOUR BLOG URL/search" style="display:inline;" method="get">
<strong>NAME OF YOUR BLOG<br/></strong>
<input id="b-query" maxlength="255" name="q" size="20" type="text"/>
<input id="b-searchbtn" type="image" src="IMAGE URL" align="top"/>
</form></p>

Remember to insert into the code the IMAGE URL, where your picture is uploaded. You can align the image to the top, bottom or set a horizontal space between the bar and the image by using a hspace tag. For more examples on alignment of images, you may refer to the article Hyperlinks and Image Links (II).
While it is alright to replace the button of your Blogger search box, you may not want to do that with the Google search box since their T.O.S. disallows any alteration of their code.

IceRocket Tags: ,

2009-04-05

Image

Backup your Blog Posts and Comments

NOTE: These are instructions for Beta (XML) Blogger Blogs
NOTE: Even though some of these options take care of your widgets, it's always good to Download widget manually (copy widgets HTML, and paste it in any text editor, more instructions here)


We are going to explain how to Back up your entire Blog Content, including Posts, Comments and Widgets.
If you are only interested in Backing up (saving) your Template / Layout Design read this article.

Ok, there are a few methods to do this. There are more that few, but they are kind of different. Let's see the most practical ones first.

1. BACK UP WITH BLOGGER
The easiest possible way.... Go to:
SETTINGS ► BASIC ► beside BLOG TOOLS, click on the Export Blog, and once more on EXPORT BLOG button.
Choose the location where you want to save the file, and click Save. And that's it!

Your Blog (content + posts) is save as .xml document. Quite small, too. You will not be able to see it, or read it on externally, but you can always upload it through Blogger.
This is also suitable for exporting certain posts to another Blog, but we'll cover that in some other tut...

You Blog is saved to a hard drive (your computer), and if anything happens, you can always bring it back.

2. BACK UP ONLINE USING "BLOGBACKUPONLINE"
Yet another easy method. You just have to visit BlogBackUpOnline, open an account, register your blog, and it will be backed up daily. They offer enough memory (space) to store your Blog. Even for a Full time blogger :)


3. BACK UP YOUR BLOG USING SCRAPBOOK FIREFOX EXTENSION
For the users of Firefox Browser (if you're not, just download it here) there's a way to Back up your Blog using Scrapbook extension. You can download Scrapbook here. Install it, restart Firefox browser.
For the detailed instructions download this Pdf Document.


There are some other alternatives, (like downloading Complete Web Pages manually), but I found these the most appropriate and practical...Good luck with everything.

Image

copy your Blog - The easy way. And the hard one...

Ok. You've decided to print your Blog. To make a little book of it's content. A memory. Or a present. Or just want to read your favorite Blog anywhere. Maybe back it up and have a hard copy? Or whatever....
Fortunately, there's a few great options for doing this. And a few bad ones....

SO, WHAT ARE MY OPTIONS?


1
. My first choice would be PrintWhatYouLike.com. This is a free web page editor that gives you control of how web pages look when printed. They really did their job for making the Print pages printer-friendly. Advantages:

  • the service is so easy to use
  • it's free
  • you can optimize your print to perfection (online)
  • save your document in .pdf or print it directly
Disadvantage is that you'll have to do this for every page. But it's worth it....
Visit the site, and see for yourself...


2
. Blog2Print! It's powered by SharedBook.This service offers you to print your blog and turn it into a professionally-published Blog Book. Well, sounds great!
Advantages:
- it's totally Blogger friendly
- you can customize it into detail
- it takes care of your complete content (no matter how big it is)
- it looks great
- it takes just a few minutes

The only disadvantage is: it's not free. But you can't take this as disadvantage. The service is perfect, and it's not a big money after all.....Here's the bill for printing my Blog:

...you can choose Download, and print it for yourself. Which is quite cheap. Or let the company make you a real Book...


3. First thing we all think of is: well, I'll just use File --> Print or CTRL (Apple Key)+ P. End of story.
This sounds easy. And fast. Fast - well, depends. But not so easy if you have hundreds of Posts....
Disadvantage of this method is that you can't really optimize your printing. The print will include website header, sidebar and advertisements.
But for printing a single article (post) this method is golden.

Anyways, if you decide to do it this way, at least consider little bit of optimizing.
Normally, you would use File --> Print, and let the printer do the job. And the result is print of complete web page.
But, if you decide to get rid of some elements in your print (like sidebar and banners, or whatever..), you should do this:
- highlight the text (pictures) you want to print
- go to File --> Print
- in the Print Range dialog, choose Selection
- click Print


4
. This would be Blurb. But, unfortunately, it does not support Blogger any more.....But you can still play with it, and try to make a book. Not directly from your Blog, but maybe page by page...
Image

Back up Your Blogger Widgets

Reason why we do this:
► if we want to switch to a new Template (change a design)...
► if we want to switch to another Blog platform...
► to make sure we don't lose our gadgets (widgets) if something happens...
1- See This Video


2. BACKING UP WIDGETS THROUGH PAGE ELEMENTS
Sign in to your Blogger account, then go to: LAYOUT -- PAGE ELEMENTS.

Gadgets you've added are your Widgets. You have to click on EDIT under each widget (gadget), copy the code, and paste it into Notepad, or some other HTML text editor.

Don't worry about LABEL, ABOUT ME and ARCHIVES widget. They are default, and you can't copy them. You will not lose those...
Later, when you install a new template, just add the code you've saved through Add Gadget option, or in directly in HTML of your template (if necessary) ...
Image

More pictures in one row - or side by side pics

By default, when you upload pictures (images, or videos)) into your Blogger Posts, they are placed one after another. In one column.


The only thing we can choose, is to align them (left-center-right). There's no option to organize them so they can be next to each other, in one row (horizontal).
The best way to do this, is using the TABLES (if you want to know more about HTML Tables, visit www.w3schools.com).

1. You have to find out what is the WIDTH of your post area. To calculate how many pics can fit there. In Blogger, go to LAYOUT --> EDIT HTML, and in code section, find the following:
#main-wrapper {
width: 410px;
...so, in my case, it's 410 px. But you can't use all of it. Margins are also included. So, you can use about 390-400px.

2. Calculating. How many pics will fit.
Important thing to know is, when we place pictures in the table, we will make them smaller. But clicking on each, they will open in full size.

3. Upload pictures to:
- free web host service to get the URL address (Photobucket, Picasa, TinyPic...)
- or upload pics directly (through blogger), and get the code from there

4. Let's make a table. I'll make one with 1 Row (horizontal), and 3 Columns (vertical). And place my pics in it.
PLACE THE CODE IN "EDIT HTML" MODE! See the picture:
Here's the code for it:
....REPLACE the lines in orange, with your pics URL (from a free web host).
....in blue, change number 0 to 1,2,3,4.....if you want a border around the table
....adjust width accordingly to width of post area (120 + 120 + 120 = 360 px, it fits into 410 px)
....change the green text to whatever (you can see this when placing your mouse cursor on the pic)
....in purple, give your picture a name (for search engines)
....and here's the result:

...when you click on your pic, you'll see the full size of it...

PROBLEMS:
► if you haven't deactivated it, the default blogger border will still appear around the pic (look at the arrow in the picture above) . If you want to remove it from certain pics, add some style (in orange) to the the existing line (in white):
...use the same rule for every picture...

► notice a lot of empty space between Title and Table. This happens because Blogger adds a
tag for each time you press the Enter key to start a new line. To reduce it, add the following code ABOVE the table:

...and this one UNDER the table:
So, these are the basics. It ain't so complicated, and there's a million options. You can use Tables for:
  • inserting pictures (make more rows, columns....)
  • placing text, making bullet lists
  • placing videos side by side
  • really, whatever you can think of....
Options:

-- add some headings to the pictures, make another row, and place it above (or under) the pictures. For my example, like this:
center">Name 1 center">Name 2 center">Name 3

pic name

pic name

pic name
...added row is in orange
...you can change the alignment into right, left (in green)

...if you'd like to change font color, size, family, add this code:
...change the styles to whatever suits you...

-- leave an empty cell by not placing nothing between:
-- fill the cell with text, instead of picture:
Some text goes here...
-- color the cell with some color:
Some text here...
-- add some space (padding) from borders:
-- create bullet list in the cell:
That's about it....Learn more visiting www.w3schools.com.CONCLUSION: This can look like a big deal, but really, it's not. When you do it once, you're ready. Save the code somewhere (Notepad, ....), just copy it, and paste when composing post. You can also create tables using any HTML editor (like Dreamweaver, for example). Just copy the code from it.... There's also a way of doing this through Windows Live Writer, if you're using it.
Title of the list
  • something
  • something else
  • nothing

Image

Customizing videos in Blogger Tutorial 3


In tutorial How to add a video in Blogger we've talked about the options of placing a video in our Blog...Them in Part 1 and Part 2, we've learned something about video customization, slideshows...
This time, I'll show you how to make a Video Gallery and set the video to Autoplay.

MAKING A VIDEO GALLERY
Video Gallery or Video Wall is a group of your favorite videos (personal or public ones) displayed in a gallery box with video thumbnails.

◄ DailyMotion Video Wall ►
Dailymotion is a video hosting service website with great interface and features. You can share videos, create your channels...
Here's the example of the video wall created in Dailymotion:

...stylish. Anyway, the steps are:
► create an account with Dailymotion.com
► go to My Channel
► under Video Tools (left menu), select Create a Videowall

Options:
► choose a channel you'd like to display (public, or your personal..)
► you can adjust the size (rows, columns)
► autoplay. zooming, video titles, spacing...

Copy the provided code, and paste it into your Blog Post, or Sidebar/Footer using a HTML/JavaScript gadget from Add a Gadget (LAYOUT ► PAGE ELEMENTS)

....as simple as it gets...

◄ BLINKX Video wall ►
Blinx is the world’s largest and most advanced video search engine. It's very intuitive. You'll figure it out in a second...Here's the example of the Video wall created in Blinkx:


..Steps:

► go to blinkx.com
► search for the videos of your interest
► drag the videos into your playlist box (bottom left)
► when you're done (you can place 1 or 101 video - it doesn't matter), click on Wall it on the bottom of the box..
► copy the provided code, and paste it into your Blog Post (rather in HTML MODE, than COMPOSE)

Video wall will have a certain width and height....Just change it to fit your Blog post (refer to resizing videos in Part 1)

That's it...

◄ Videos in HTML tables ►
Here is another way of organizing videos in your Blog. It's quite old fashioned, but still works. In this example, I've made a video gallery from Youtube videos (you can use videos from anywhere, of course):


Video 1Video 2Video 3Video 4
Video 5Video 6Video 7Video 8
Video 9Video 10Video 11Video 12
...3 rows with 4 columns, and a caption for each video...You can modify the videos size, add some borders, background color...
..if you like it,
 

Video 1 Video 2 Video 3 Video 4
Video code goes here... Video code goes here... Video code goes here... Video code goes here...
Video 5 Video 6 Video 7 Video 8
Video code goes here... Video code goes here... Video code goes here... Video code goes here...
Video 9 Video 10 Video 11 Video 12
Video code goes here... Video code goes here... Video code goes here... Video code goes here...
...replace the lines in green with your own titles, and lines in orange with the video code provided from a site (Youtube, Metacafe....)


SET A VIDEO TO AUTOPLAY IN BLOGGER
Here's the example how to set a Youtube videos to autoplay when your Blog post is opened:
The original video code:
And after tweaking:
&autoplay=1">&autoplay=1" type="application/x-shockwave-flash" allowscriptaccess="always" allowfullscreen="true" width="425" height="344">
..you have to add &autoplay=1 (in orange) just like in the code above...in both places.
Image

Customizing videos in Blogger Tutorial 2

In article Add a Video in Blogger Post, we talked about uploading and embedding videos in your Blog.
And in Part 1 of video customization tutorial, we learned to resize the video, position it (align it) and add some captions to it.
In this article, we'll learn to make a PLAYLIST.

HOW TO MAKE VIDEO PLAYLIST?

◄ YOUTUBE VIDEOS ►
Ok, you already know how to add a youtube video into Blogger post. Now, we'll going to see how to make a playlist from the videos we choose.
First, create an account with Youtube.com.

Below, you can see my examples:


Player example 1Player example 2
...these are default Youtube players. As you can see, I've chosen a few videos I'd like to play on my Blog, and just embedded the player into the post. Options:
► yes, you can change the size of the player (read Part 1)
► when you update your playlist on Youtube, the one on your Blog is automatically updated

To create your playlist, you need to have an account. Rest is simple:
► browse (search) for the videos you like
► include the certain video in the playlist (click on the Playlist link under the video)
► when you've created your playlist, go to your Account
► on the list of options, click on Custom Video players
► customize your player, and select the playlist you'd like it to play..
► you can create different playlists, and choose different settings for each
Click on the picture to enlarge it:

How to place Youtube videos in Blogger Sidebar?
1. The easiest possible way - in your Blogger account, go to LAYOUT ► PAGE ELEMENTS ► "Add a Gadget" ► choose VIDEO BAR from the list
Here, you can choose what kind of videos you want to feature on your Blog. To choose your own Videos, just create and edit your channel in Youtube (Account ► Edit Channel)

2. Google wizard - similar to number 1., but more advanced. You have the option to place the playlist horizontally or vertically, and choose what channels or videos you'd like to show....
Copy the code provided, and place it in HTML/Java script gadget (or alternately into Post).

3. Also, you can place a third party Gadget/Widget to display Youtube videos. Advantage - different skins and options. Disadvantage - sometimes, they are buggy. Here are the links of some cool ones:
Youtube Videos Gadget
Youtube Videos Channel
Youtube Sidebar Widget

4. Old fashion way....Create HTML table, and place the embed codes into the column...choose width and height, borders, captions....
This may seem to be dull, but trust me, you can get great results....More about tables + videos in Part 3

5. You can also add RSS feed of some popular Youtube channels...Read more about it here.

***

◄ PLAYLIST BY MYFLASHFETISH ►
This is a cool one, you have to admit....

VideoPlaylist
I made this video playlist at myflashfetish.com

Advantages ► design, customizable (autoplay, loop), cool
Disadvantages ► you can only make a playlist of music videos

If you're interested, here's how to:
► create your account with MyFlashFetish.com
► click on Video Playlist tab
► on the left, you can customize your player design, on the right make your playlist (click on Add to Playlist beside the video)
► choose if you'd like it to autoplay, name it, and Save (Get code)
► COPY the code from below (just click on Copy button) or click on Blogger icon. I preffer coping the code, and pasting it manually, but it's your choice...
► !CAUTION! when you paste the code into post, and hit Publish, you'll may get an error....just check the box beside the "Stop showing title or body HTML errors for this post"...No worries, it will work.
Image

Customizing videos in Blogger Tutorial 1

In article Add a Video in Blogger Post, we talked about uploading/embedding videos in your Blog...Plain and simple.
Now, we'll add some spice to it. We'll learn how to:

► change the size of uploaded video (make it bigger, smaller, wider...)
► position the video (center it, align it left or right)
► add captions to videos (titles, headings)
► make the playlist of the videos we choose
► set a video to autoplay when Blog post opens
► make a video gallery in post

***


VIDEO SIZE
When you upload or embed a video from a certain site, it will appear in your post in default size. The size depends of the provider or service from where you get the video.
It's important to know that you can adjust the size (width + hight) to whatever suits you....

2 things you should keep in mind:
► change the width and height values proportionally. (if you care about the video quality) But this is not a must-do. You have to keep the same ratio, so that the video doesn't get stretched - when you increase/decrease the width, you'll get the height value by multiplying the width by 0.8235.

► in order to fit the video perfectly (the width part) into your Post, check your HTML, and find out what's the width of your post section (usually under the name main-wrapper, or main..)

Ok, you've uploaded or embedded the video in the post. Either way, you'll be able to see the code of that video clicking on EDIT HTML tab in your Post editor.

All you have to do now, is change the width and height values in the code, to whatever suits you. Here are some examples:

◄ Video uploaded through Blogger, using video icon ►
The code looks like this:
320" height="266">
...in green, you can see the values for width and height. Adjust them to whatever you like...

◄ YouTube Videos ►
The code looks like this:
425" height="344">425" height="344">
...here, you'll have to change the values in green to whatever suits you...as you can see, you have to do this in two places... :]

Basically, that's it. No matter where do you get your video from (Youtube, Google videos, Metacafe, or any other service), you'll do the same thing. Just tweak the height and width in the provided code....

WITHOUT TWEAKING THE CODE
...you can also choose between 4 different default sizes that Youtube offers...All you have to do is click on the Customize icon beside the code:

...when you make your choice, copy the code, and paste it into the post...

***

POSITION OF THE VIDEO
If you have a small sized video, you can choose where you'd like to position it. You can align it left, right, or center it.

◄ Video uploaded through Blogger, using video icon ►
This is the easy one. After successful upload, in COMPOSE mode, click on your Video, and align it clicking on the alignment icons in the Blogger Toolbar...

◄ YouTube and other Videos ►
Here, you'll have to place some extra code. It's easy. We'll just wrap the video in the new div element (container), and add some alignment. You'll find the code of the video clicking on:

I want to align my Youtube video to the right. Here's the code:
>
...in pink, you can see the new, added code...
...same way, you can center the video, changing text-align:right; into text-align:center;...
...left alignment is the default one...

***
You can also squeeze the video into the text, and align it (same like you do with the pics). Now, there's no button that will do this for you. You'll have to place some code. Again.
To achieve the effect from the picture above, you''ll have to add the code in green, around your video code:
...this will align the video on the left, and it will be wrapped with text...
...you can align it to the right, just changing float:left; into float:right;...
...we've added some margin to distance the video from the text...you can adjust this, of course...

***


CAPTIONS
Adding a caption, title or heading to our video is also quite easy. I'll show you the example where the video is centered, and caption is centered under the video:
And the code:
You can write something here...
...in green, you can see the added code...
...we've added two div elements, one for the style, and one for the caption....
...you can play with it, and place a caption on the top, align everything to the right or left....

***
Next time, we'll learn how to embed a custom video playlist in our blog, how to make a video gallery in the post and activate the autoplay option....
Image

Add a video to your Blogger Blog(tutorials)

We'll say something about How to upload video files in Blogger. It's quite simple really. You can upload (embed is better word) videos from services like Youtube.com, or you may want to upload your personal videos from your camera or computer.

 
MY OPTIONS?
As I've mentioned, it depends what do you want to do, but basically, we can wrap this in 2 categories:
1. Embedding videos from Youtube (or similar services) - fast; practical; public files
2. Upload videos through Blogger control panel - slower; practical, personal (private) files

1. To embed a video into your Blog is the simplest thing. Honestly. You can find tons of videos on Youtube.com (the most popular free video hosting and online video streaming service).
► go to Youtube.com and find the video you'd like to place into your Blog
► copy the code from the Embed box on the right
► paste it into your post (rather in EDIT HTML mode, but COMPOSE will do the thing too)
Here's the example. This is my favorite cartoon - La Linea:Ok, this was easy. But you can also get more from Youtube. Creating your account with Youtube gives you the option of:
► uploading your own videos and sharing them
► you can make certain videos private
► create playlist
► use the Share option - to share videos in your Blog directly from Youtube (this is convenient if you post youtube videos often)

***
2. You can Upload a video file from your computer or camera while composing/editing a post. Your videos are kept private, and are not shared. This is great if you have personal videos, and don't want expose them anywhere else, except on your Blog. Steps:

► click on the video icon in the toolbar while composing the post
► browse for the file on your computer/camera
► choose a title + check the Agree to terms box
► click Upload video

Here's the disadvantage of this method - it's slow. Upload time depends on the size of the video file and your internet connection speed.
To make things more smoother, I suggest compressing or converting your video file (decrease it's size) before uploading it to Blog.
Here's what it looks like:

video

Blogger excepts AVI, MPEG, QuickTime, Real, and Windows Media formats and the max size of the file is 100 MB.
My advices for converting/compressing video files:
And here's some great tools for downloading any kind video from internet to your computer:

Next time, we'll learn how to customize our videos (change their size, width, make a slideshow, gallery, add some colors....).


Image

Moving elements in Post Footer - Labels, Posted by, Comment Link...

n this tutorial we're going to identify the code of each element in default Blogger XML templates (new Blogger Beta). The reason we do this:

► because we'd like to rearrange the elements in post footer (divide them, change positions)
► move one (or more) of the elements somewhere else (like: under the Post Title)


REARRANGING ELEMENTS
You can rearrange Post footer elements without tweaking the code:
DASHBOARD ► LAYOUT ► PAGE ELEMENTS click on Edit in BLOG POSTS box:

If this works for you, great!
But, lots of times, you CAN rearrange the elements by "dragging" them around, and they will seem to be rearranged, and when you go check your Blog - NOTHING has changed!
You can solve this with:

► by manually rearranging the elements in HTML code

If you're ready, let's go visit the HTML of our template....
Before making any changes to your code, I suggest to back up the current Blogger layout. Then go to:
LAYOUT ► EDIT HTML ► click on Expand Widget Templates


Use the [CTRL] + F (or (Edit ► Find from your browser's menu) and search for this line:
Post-footer is divided in 3 lines, and each line has some elements in it(Labels, Comment Link, Posted by, Timestamp...) wrapped in a span.
...in orange, you can see how to identify the Post-footer line (in this example, 1st line)
...in pink you can see the code of Posted by, in green of Timestamp, and in blue of Comment Link

Notice how each element is wrapped in a span:


...in orange, you can see the opening span and closing span
Span class identifies the element:


span class='post-author vcard' ► Posted By
span class='post-timestamp' ► Timestamp
span class='post-labels' ► Labels
span class='post-comment-link' ► Comment link
span class='post-backlinks ► Links to this post
span class='post-icons' ► Email this post icon and Quickedit icon
span class='reaction-buttons' ► Reactions
span class='star-ratings' ► Star ratings
span class='post-location' ► Post location


The whole idea of rearranging elements manually is a simple CUT and PASTE:
► CUT the code of the element you'd like to move
► PASTE it in the line you prefer

You need to cut the entire code of the element, meaning the whole Span. For example, if I want to move the Labels in the first line, I'll CUT the code representing Labels:
...and PASTE in somewhere under the 1st Post footer line:
...apply the same rule for other elements.


MOVE THE ELEMENT FROM POST FOOTER UNDER THE POST TITLE
Same way you rearranged the elements in Blogger post footer, you'll move them under your Post Title.For this example, I've chosen to place my Blog Labels under the Post title.

1. First thing is to CUT the code of the element we'd like to move (Labels in my example):


,


..the code you CUT needs to be wrapped in a Span (in orange) (DO NOT cut anything extra!)

2. PASTE your code into Notepad (Texedit)

3. Locate this line in your code:
...and place your Labels code UNDER this line.
You will notice that the Labels are now in place, but without the default style. The reason this happened is because we've "ripped" the Labels from Post Footer, which has a defined style.

4. We have to create a style for the Labels element, and adjust it to fit. Add the code in orange around the Labels code:


...we've just wrapped the Labels code in a "div" so we can manipulate with it better.

Next, copy this:
.under-title {
margin: 0 0 10px 0;
color:#000000;
text-transform:uppercase;
letter-spacing:0px;
font-family:arial;
font-size:10px;
}

And place in anywhere ABOVE this part:
]]>
...in pink, you can adjust the margin of the element
...change the style (color, line-height, font) to whatever suits you..


MOVING MORE ELEMENTS UNDER POST TITLE
Now, this will be much easier. You just have to CUT the the code of the element (the entire span!), and place it in the "div", like so:


..in orange, you can see the main div that defines the style for the whole container, and everything you place there, will automatically "pick up" the style...
..now, this will place everything in the same line. Hm. If this is to messy for you, you can place each element in it's own row.
All you have to do is change the word:
span into div

For example, the Labels code will look like this after the change:
<div class='post-labels'>


,

div>
..in orange, you can see we changed span into div...

That's it.

Total Pageviews