Showing posts with label blogger-hacks. Show all posts

2009-05-21

Image

Show Only Post Title In Blogger Home Pages


1.Login to Blogger
2.Go To LAYOUT
3.Then Click On Edit HTML
4.Check Mark Expand Widgets
5.Press Ctrl+F

Now search For below code line in red :-

<b:include data='post' name='post'/>

And Replace it with Below Codes:-


<b:if cond='data:blog.homepageUrl
!= data:blog.url'>

<b:if cond='data:blog.pageType != "item"'>

<h3 class='post-title'><a expr:href='data:post.url'><data:post.title/></a></h3>

<b:else/>

<b:include data='post' name='post'/>

</b:if>

<b:else/>

<b:include data='post' name='post'/>

</b:if>


Now Preview Your template. If it accepts Your Html.Then Save It.

Now open your blog and click on the label or archive page of your blog it will show only post title .

I hope you will be satisfied with it.This is one way.

Now there is another way of doing it but the results are different.

If you want to show only title of posts in your blog home page also,then only follow this way and implemet it.If you want only label page to show post title just get stoppd after reading first way only.

Now the second way to show only post title in blogger home page too.

1.Login to Blogger
2.Go To LAYOUT
3.Then Click On Edit HTML
4.Check Mark EXpand Widgets
5.Press Ctrl+F

Now search for this line in red :-

<p><data:post.body/></p>

After finding this line replace it with below codes :-


<b:if cond='data:blog.pageType == "item"'>
<p><data:post.body/></p>
</b:if>


This will show only post title on all pages of blogger including homepage label and archive pages.

One of my reader asked to show post title only in archive pages so i am placing code for him

Just use these codes to replace the above red line in place of above codes.


<b:if cond='data:blog.pageType == "index"'>
<p><data:post.body/></p>
</b:if>


And if you dont want to use post titles in archive pages use archive in place of index in above codes that's the only word making basic difference between the codes.

*Note-If you are using read more hack in your blogger you will get above red line twice.So replace only the line that appears first in your blog html code and leave second one as it is.

And then preview your template,if its ok. Save It.


Image

Adding scroll bar to sidebar widgets

We can add the scrollbar only to one or several of the widgets. To do that, we must first know the ID of the widget. When we are at Template -> Edit HTML, scroll towards the bottom of the template code. You will see something like this:-


<div id='sidebar-wrapper'>
<b:section class='sidebar' id='sidebar' preferred='yes'>
<b:widget id='LinkList1' locked='false' title='General' type='LinkList'/>
<b:widget id='HTML1' locked='false' title='' type='HTML'/>
<b:widget id='Label1' locked='false' title='Label' type='Label'/>
</b:section>
</div>


In this example, we have added a Link List Page Element into our Sidebar and the ID for this widget is “Linklist1”. If we have more link lists, the IDs will be “Linklist2”, “Linklist3” and so on. Also, we have inserted a HTML/JavaScript Page Element and the ID is “HTML1”. The third widget we added is a Label list and the ID is “Label1”. Look at your template and identify the widget. Take note of the widget ID.

With the ID, we can now add the overflow property into the stylesheet under /* Sidebar Content */:-

/* Sidebar Content */
#Label1{
height:200px;
overflow:auto;
}

This will add the scroll-bar to the Labels widget only without affecting the other widgets. Insert the relevant ID of your widget into the portion shown in blue.

another Method


Select HTML JAVASCRIPT to add the page element .

Now You have to add some html codes to his page element to show of the scroll bar menu widget to the sidebar of your blogger.


<div class="widget-content">
<ul style="height:150px;width:150px; overflow:auto; ">

<li><a href="http://3rb-game.blogspot.com/">Your Text</a></li>
<li><a href="http://3rb-game.blogspot.com/">Your Text</a></li><span style="font-weight:bold;"></span>

</ul></div>


Copy this codes and paste it to page element and save it.

Now preview your blog.

You can change your links
http://3rb-game.blogspot.com/ and text in the codes to show of yours links and posts.

Note:-In the codes you can edit height and width in red to adjust it to your blog.


2009-05-19

Image

Syntax Highlighter For Blogger

Syntax Highlighter For Displaying any types of Codes and Scripts In Blogger posts.As bloggers like us sometimes need to post different languages codes in our posts basically for programmers and some need to highlight some codes too in blogger posts like me to have on tutorials and display css codes.
Syntax highlighter is the plugin actually designed for wordpress blogs but we can still use it in blogger platform but with some features.

This is how the syntax highlighter looks below you would have seen in blogger posts.


Now follow on these steps on how to install this syntax highlighter in blogger blog.

Step 1 :

Login to your Blogger account and navigate to Layout section . Then go to Edit Html Tab.

Step:2

Press Ctrl+F and search for </head>

Step 3:

Add The below codes above this </head>


<link href='http://www.sigmirror.com/files/16077_mfmek/SyntaxHighlighter.css' rel='stylesheet' type='text/css'/>
<script language='javascript' src='http://www.sigmirror.com/files/16075_vovs4/shCore.js'/>
<script language='javascript' src='http://www.sigmirror.com/files/16067_qdw00/shBrushJava.js'/>
<script language='javascript' src='http://www.sigmirror.com/files/16068_sxqrw/shBrushJScript.js'/>
<script language='javascript' src='http://www.sigmirror.com/files/16074_y4x0p/shBrushXml.js'/>
<script language='javascript' src='http://www.sigmirror.com/files/16065_pax2t/shBrushCss.js'/>
<script language='javascript' src='http://www.sigmirror.com/files/16081_8ztl5/shBrushProperties.js'/>
<script language='javascript' src='http://www.sigmirror.com/files/16080_4fwwe/shBrushBash.js'/>


Please download the all above js files and upload to your own server and chnage he above urls with yours as mine may not work because my server bandwidth exceeds very fast.


Now search for </body>

And place the below codes above it.


<script language='javascript'>
dp.SyntaxHighlighter.ClipboardSwf=&#39;http://www.sigmirror.com/files/16078_i3xhu/clipboard.swf&#39;;
dp.SyntaxHighlighter.BloggerMode();
dp.SyntaxHighlighter.HighlightAll(&#39;code&#39;);
</script>


Now save your template.

If you find it difficult,add this widget direct from this page.

Now whenever you are posting codes in your blog posts place the codes between these tags in your posts.


<pre name="code" class="java">
<----Your all codes Go here--->
</pre>


Change the class java to any other language if your using that in your codes like css,javascript,c-sharp or any else.And please only you add those languages that you have included in your html that you have added as i told you to add before /head tag.

If you want any other language codes to place and not having it please get it all


2009-05-15

Image

Top Blogger Hacks Make Your Blog Professional


Things are quite easy and enjoyable for bloggers who are blogging on self hosted blog with wordpress blogging script. Lots of useful plugins are available online for free to make blog professional. For blogger.com users things are bit difficult but not much. I used to be such blogger myself, in fact I still blog on my free blogspot blog. Here is the list of hacks that can make your blog impressive.


SEO Hacks For Blogger.com

Different Title/Description to post hack
We all know how important SEO is to get rank in search result. Time and effort will go in vain if your post doesn’t get rank for keywords, and apparently you are not going to get what you have started blogging for. This hack will provide separate title and description to your particular post. I have achieved extremely good result because of this hack. You don’t have to use any Java Script. It is the easiest hack to be applied. Configure this hack.
‘Read More’ Link Hack
You must have landed on kind of blogs where home page shows only some initial part of post and you have to click on ‘Read More’ or ‘Continue’ link to read full post. Wordpress bloggers call it Excerpt plugin. Google doesn’t provide any option for such navigation, so, you have to manually configure this hack. This hack ensures that visitors click on your post link to read full post. This is quite good strategy to increase clicks on your blog. Click Here For Hack
Tag Clould Hack
Tag cloud is collection of keywords that best describes the content of the post. Most frequently the used keywords (in our case a ‘label’) will be distinguished by high font weight and font size. Click here to configure this hack.


Web 2.0 Effect Hacks


Deepjax / Ajax Lable Hack
This hack is the one that I am using on my blogger blog (Click on blue top horizontal tab). It gives wonderfull effect of web 2.0. It is the form of ajax label hack. Deepjax is the name I have given to this hack as its been created by Deepak (To give him credit). Click Here to configure this hack.
Tabview Widget
Tabview is the very famous widget. You can find tabview widget to all major websites (specially news portal websites) like yahoo and about.com. Hoctro is the developer of this hack. It is very good solution to display recent post, recent comments and links at just one spot. Click here to configure this hack.
Add Social BookMark Buttons To Post Hack
Social bookmarking sites are the latest buzz on internet. Millions of users of sites, like digg, Stumbleupon and Del.icio.us, submit or rate an article to this sites. More ratting will give you more traffic. Even a normal person can get his article exposed to international readers. Configure this hack.
Widget on Particular Post
By default your all widgets can be seen on all blog posts. This hack enables you to display a particular widget on related post. You can also use this hack to show a widget on all post except on home page. Configure this hack.


General Hacks

Welcome Note / Few words Hack
It would be nice if you can display welcome note to greet visitors on home page and not on all post (it can be done with ‘wideget on particular post’), and it will be really great if you can display few words on all labels. Click here for hack
Comments List Widget
Recent comment hack displays list of comments (with link of the commentors’ blog). It is the good way to give traffic to who have commented thus you can pay back your readers and enticed them to leave comments again. Guide to get this hack .
Related Posts List Widget Hack
This hack will list the post urls posted with same label. readers are most likely to visits post if the post is about something interested in. A good way to keep visitors spending more time on your blog. Use this hack.
I have successfully applied all hacks on my blogspot blog. You may leave comment for support, if you have any trouble.
Image

Add Google Ajax Feed To your Blogger Templates

blogger recent posts Ajax feed GoogleFirst of all, i want to give credits for New Blogger's (blogspot.com) recent posts widget using Google's Ajax Feed API to Hecto, i just modified the script to make it open in the same window, work with FeedBurner and a few other minor tweaks.

Now we can begin. You can see this New Blogger Recent Posts Widget using Google's Ajax Feed API in the right side of my blog. Move your mouse over it to see how it works.

1. You will need a key from Google which you can get in a second without any registration, by going to this link.

2. Go to your Blogger Dashboard > Layout > Edit HTML, check "Expand Widget Templates" and find: </head> and paste the following code above it


<!-- recent posts ajax -->
<script src='http://www.google.com/jsapi/?key=YOUR KEY' type='text/javascript'/>
<script src='http://www.google.com/uds/solutions/dynamicfeed/gfdynamicfeedcontrol.js' type='text/javascript'/>

<style type='text/css'>
@import url(&quot;http://www.google.com/uds/solutions/dynamicfeed/gfdynamicfeedcontrol.css&quot;);

#feedControl {
width : 353px;
margin-left : 1px;
background : white;
font-size: 13px;
float:left;
}
.gfg-title {
font-size: 17px;
border-bottom: 1px solid #307396;
font-weight: normal;
color : #BF0000;
background-color: #FFFFFF;
}
.gfg-title a {
color : #005580;
}
.gfg-root {
border: none;
font-family: Verdana,Arial,Helvetica,sans-serif;
background-color : white;
}
.gfg-list {
background-color : white;
}
.gfg-listentry-odd {
background-color : white;
}
.gfg-entry {
background-color : white;
width : 100%;
height : 7.5em;
position : relative;
overflow : hidden;
text-align : left;
margin-top : 3px;
}
.gfg-listentry-highlight {
background-image : url(&#39;http://nilarimogard.googlepages.com/garrow.gif&#39;);
background-repeat: no-repeat;
background-position : center left;
background-color : #F6F6F6;
}

</style>
<script type='text/javascript'>


function load() {
var homeUrl = &quot;<data:blog.homepageUrl/>&quot;;
var feed = homeUrl + &quot;atom.xml?redirect=false&quot;;
new GFdynamicFeedControl(feed, &quot;feedControl&quot;,
{linkTarget : google.feeds.LINK_TARGET_SELF, numResults : 5, title : &#39;Recent Posts&#39;});
}

google.load(&quot;feeds&quot;, &quot;1&quot;);
google.setOnLoadCallback(load);
</script>

<!-- /recent posts ajax -->

Change YOUR KEY with the key you got in point 1. The bold code above can be changed to suit your needs. numResults : 5 is the number of posts in this widget, change the number to the number of posts you want to show up in your recent posts widget. title : 'Recent Posts' can also be changed with the title you want for your widget, or you can remove title : 'Recent Posts' if you want your feed's default title to be displayed.

3. Create a new "HTML/JavScript" widget, then add this line to the content:


<div id="feedControl">Loading...</div>

Save it and you're done.

Customizing the recent posts Ajax widget


To change the font, colors and so on of your widget, modify the CSS styles:


#feedControl {
width : 353px;
margin-left : 1px;
background : white;
font-size: 13px;
float:left;
}
.gfg-title {
font-size: 17px;
border-bottom: 1px solid #307396;
font-weight: normal;
color : #BF0000;
background-color: #FFFFFF;
}
.gfg-title a {
color : #005580;
}
.gfg-root {
border: none;
font-family: Verdana,Arial,Helvetica,sans-serif;
background-color : white;
}
.gfg-list {
background-color : white;
}
.gfg-listentry-odd {
background-color : white;
}
.gfg-entry {
background-color : white;
width : 100%;
height : 7.5em;
position : relative;
overflow : hidden;
text-align : left;
margin-top : 3px;
}
.gfg-listentry-highlight {
background-image : url('http://nilarimogard.googlepages.com/garrow.gif');
background-repeat: no-repeat;
background-position : center left;
background-color : #F6F6F6;
}

To change the red arrow, save this image: http://nilarimogard.googlepages.com/garrow.gif, edit it with the color you want and upload yours to some host, then change it in the above code.

You cand find all the CSS elements for the Google Feed API, here.

For further documentation regarding the Google Feed API, visit it's homepage.


2009-05-06

Image

All Feeds using FeedBurner

Integrate your FeedBurner feed with your blogger beta blog.

1) Feed Auto-Detection

Go to Layout > Edit HTML and find this line of code


<b:include data='blog' name='all-head-content'/>

which actually splits out something like this


<meta content='text/html; charset=UTF-8' http-equiv='Content-Type'/>
<meta content='true' name='MSSmartTagsPreventParsing'/>
<meta content='blogger' name='generator'/>
<link rel="alternate" type="application/atom+xml" title="YourBlogName - Atom" href="http://yourblog.blogspot.com/feeds/posts/default" />
<link rel="alternate" type="application/rss+xml" title="YourBlogName - RSS" href="http://yourblog.blogspot.com/feeds/posts/default?alt=rss" />
<link rel="service.post" type="application/atom+xml" title="YourBlogName - Atom" href="http://www.blogger.com/feeds/yourblogid/posts/default" />
<link rel="EditURI" type="application/rsd+xml" title="RSD" href="http://beta.blogger.com/rsd.g?blogID=yourblogid" />


when you view the page source (In Firefox click on View > Page Source).

YourBlogName stands for the title of your blog, yourblog.blogspot.com is your blog's url, and yourblogid is a long number, the id of your blog.

The two lines with link rel="alternate",

<link rel="alternate" type="application/atom+xml" title="YourBlogName - Atom" href="http://yourblog.blogspot.com/feeds/posts/default" />
<link rel="alternate" type="application/rss+xml" title="YourBlogName - RSS" href="http://yourblog.blogspot.com/feeds/posts/default?alt=rss" />

let newsreaders auto-detect your blogs feeds. So we have to change these lines to point them in the direction of your FeedBurner feed.

Remove the line:

<b:include data='blog' name='all-head-content'/>


Replace it with:

<meta content='text/html; charset=UTF-8' http-equiv='Content-Type'/>

<meta content='true' name='MSSmartTagsPreventParsing'/>

<meta content='blogger' name='generator'/>

<link href='http://feeds.feedburner.com/yourblogname' rel='alternate' title='RSS' type='application/atom+xml'/>

<link rel="service.post" type="application/atom+xml" title="YourBlogName - Atom" href="http://www.blogger.com/feeds/yourblogid/posts/default" />

<link rel="EditURI" type="application/rsd+xml" title="RSD" href="http://beta.blogger.com/rsd.g?blogID=yourblogid" />


Replace http://feeds2.feedburner.com/yourblogname with the url of your FeedBurner feed.

Save Template.

Now that we have fixed the auto-detection part, there is still the issue of the feed-link on your posts page. This feed-link has to be made invisible, so that your visitor has no other option than following the link to your FeedBurner feed.

Go to Layout > Edit HTML and find this line

.feed-link {


Below the line add

display: none;


If there is no .feed-link class defined in your template, define it with:

.feed-link { display:none; }


Save Template.

Leave your comments and URL of your blog :)


Image

Adding left sidebar to Blogger

Denim is a standard 2 column template provided by Blogger. With small changes to the template, we can add a third column to Denim. The third column can be on the right or on the left. I added the third column to the left and called it left sidebar. Follow the steps given below to add left sidebar to your blog.
Step 1

Log in to Blogger and go to Layout > EditHTML. Check Expand Widget Templates.
Step 2
Change the header width to 960px. Edit the #header portion of the CSS.

#header {
width: 960px;
margin: 0 auto;
background-color: #336699;
Change the content-wrapper width to 960px. Edit the #content-wrapper portion of the CSS.

#content-wrapper {
width: 960px;
margin: 0 auto;
padding: 0 0 15px;
text-align: left;
Change the main-wrapper width to 480px and margin-left to 10px. Edit the #main-wrapper portion of the CSS.

#main-wrapper {
margin-left: 10px;
width: 480px;
float: left;

Step 3
In your template there is a sidebar-wrapper. This is the right sidebar wrapper. It will be like this
#sidebar-wrapper {

margin-right: 14px;

width: 240px;

float: right;

background-color: #ffffff;

display:inline;

word-wrap: break-word; /* fix for long text breaking sidebar float in IE */

overflow: hidden; /* fix for long non-text content breaking IE sidebar float */

}

Change #sidebar-wrapper to #right-sidebar-wrapper, margin-right to 10px from 14px and width to 220px from 240px.

After the editing it will look like this
#right-sidebar-wrapper {

margin-right: 10px;

width: 220px;

float: right;

background-color: #ffffff;

display:inline;

word-wrap: break-word; /* fix for long text breaking sidebar float in IE */

overflow: hidden; /* fix for long non-text content breaking IE sidebar float */

}

Step 4

Add the code given below just before the #right-sidebar-wrapper.
#left-sidebar-wrapper {

margin-left: 10px;

width: 220px;

float: left;

background-color: #ffffff;

display:inline;

word-wrap: break-word; /* fix for long text breaking sidebar float in IE */

overflow: hidden; /* fix for long non-text content breaking IE sidebar float */

}

Step 5

Find out the portion of code given below.
<div id='content-wrapper'>

<div id='crosscol-wrapper' style='text-align:center'>

<b:section class='crosscol' id='crosscol' showaddelement='no'/>

</div>

Add the code given below just below the code given above.
<div id='left-sidebar-wrapper'>

<b:section class='sidebar' id='left-sidebar' preferred='yes'>

</b:section>

</div>

Step 6

Find out the portion of code given below.
<div id='sidebar-wrapper'>

<b:section class='sidebar' id='sidebar' preferred='yes'>

Replace it with the code given below.
<div id='right-sidebar-wrapper'>

<b:section class='sidebar' id='right-sidebar' preferred='yes'>

Step 7
Save Template.

Leave your comments and URL of your blog :)


Image

Comment Numbering on Blogger

Have you ever thought of numbering your blog's comments? Well, the dream has come true. Thanks to Fernandooo1 of Randomness for this lovely hack.
Follow the steps given below to apply the hack.
Log in to Blogger. Go to Layout > EditHTML. Check Expand Widget Templates. Add the codes highlighted in red at the right places as shown in the code given below.

<dl id='comments-block'>

<script type='text/javascript'>var CommentsCounter=0;</script>

<b:loop values='data:post.comments' var='comment'>

<div class='' expr:id='data:comment.id'>

<dt expr:class='"comment-author " + data:comment.authorClass' expr:id='data:comment.anchorName'>
<a expr:name='data:comment.anchorName'/>
<b:if cond='data:comment.authorUrl'>
<a expr:href='data:comment.authorUrl'><data:comment.author/></a>
<b:else/>
<data:comment.author/>
</b:if>
<data:commentPostedByMsg/>

<span class='comment-number'>
<a expr:href='"#comment-" + data:comment.id' title='Comment Link'>
<script type='text/javascript'>
CommentsCounter=CommentsCounter+1;
document.write(CommentsCounter)
</script>
</a>
</span>

</dt>
<dd class='comment-body'>
<b:if cond='data:comment.isDeleted'>
<span class='deleted-comment'><data:comment.body/></span>
<b:else/>
<p><data:comment.body/></p>
</b:if>
</dd>
<dd class='comment-footer'>
<span class='comment-timestamp'>
<a expr:href='data:comment.url' title='comment permalink'>
<data:comment.timestamp/>
</a>
<b:include data='comment' name='commentDeleteIcon'/>
</span>
</dd>

</div>

</b:loop>
</dl>

Add the code given below to the CSS area in your template, right before ]]></b:skin>:
.comment-number {
float: right;
display: block;
width: 50px;
margin-right: 5px;
margin-top: -35px; /*comments-counter position*/
text-align: right;
font-family: 'Century Gothic','Lucida Grande',Arial,Helvetica,Sans-Serif;
font-size: 30px;
font-weight: normal;
}

/*since the numbers are actually links, we need to force the color properties*/

.comment-number a:link, .comment-number a:visited {
color: #445566 !important;
text-decoration: none !important;
}
.comment-number a:hover, .comment-number a:active {
color: #FF9933 !important;
text-decoration: none !important;
}
Save Template.
That's it. Let me know your views on this hack. Do contact me if you face any trouble in applying the hack.
If this hack was useful for you then please leave comments so that I'll be able to know who all benefited from this hack. Also post the URL of the blog in which the hack is applied so that it will help the visitors to check how the hack is working in various blogs.


Image

Show Comment Author Photos in Blogger

Follow the steps given below to display comment author photos.

Log in to Blogger. Go to Layout > EditHTML and click on Expand Widget Templates.

Add the code given below between <head> and </head> tag


<script src='http://yggomelprup.googlepages.com/blogger_comment_photos.js' type='text/javascript'/>
<script type='text/javascript'>
//<![CDATA[
addLoadEvent(function(){showCommentPhotos('commentphoto','comment-author', 1);});
//]]>
</script>

Find the portion of code given below

<dl id='comments-block'>
<b:loop values='data:post.comments' var='comment'>
<dt class='comment-author' expr:id='"comment-" + data:comment.id'>
<a expr:name='"comment-" + data:comment.id'/>
<b:if cond='data:comment.authorUrl'>
<a expr:href='data:comment.authorUrl' rel='nofollow'><data:comment.author/></a>
<b:else/>
<data:comment.author/>
</b:if>
<data:commentPostedByMsg/>
</dt>
<dd class='comment-body'>
<b:if cond='data:comment.isDeleted'>
<span class='deleted-comment'><data:comment.body/></span>
<b:else/>
<p><data:comment.body/></p>
</b:if>
</dd>
<dd class='comment-footer'>
<span class='comment-timestamp'>
<a expr:href='"#comment-" + data:comment.id' title='comment permalink'>
<data:comment.timestamp/>
</a>
<b:include data='comment' name='commentDeleteIcon'/>
</span>
</dd>
</b:loop>
</dl>

Add <div class='commentphoto' style='float:right;'/> right after line 3 and <div style='clear:both;'/> after line 26 in the above code. You can change float:right to float:left if you want the pic to be on the left instead of the right.

If you want to change the width and height of the photo then you have to customize the lines given below in the external javascript file.

BloggerProfiles.imageWidth = 10;
BloggerProfiles.imageHeight = 20;

That's it. You're done. Leave your comments and URL of your blog :)


Image

TweetMeme Button for Blogger

The Retweet button is for website and blog publishers that want to encourage their audience to retweet their content on twitter.

This button is really smart with one simple piece of JavaScript. It will give you up to date tweet counts and shorten your title and link for the retweets. Best of all it will work on any web page, anywhere!

Copy and paste the following code where you want the widget to be displayed.


<script type="text/javascript">tweetmeme_url = '<data:post.url/>';</script><script type="text/javascript" src="http://tweetmeme.com/i/scripts/button.js"></script>


Compact Version

A compact version of the tweetmeme button, with the same options as the larger button is also available.

Copy and paste the following code to use the compact version.

<script type="text/javascript">tweetmeme_url = '<data:post.url/>'; tweetmeme_style = 'compact';</script><script type="text/javascript" src="http://tweetmeme.com/i/scripts/button.js"></script>


Image

TwitThis Button for Blogger


TwitThis is an easy way for people to send Twitter messages about your blog post or website. When visitors to your website click on the TwitThis button or link, it takes the URL of the webpage and creates a shorter URL using our own URL shortener! Then visitors can send this shortened URL and a description of the web page to all of their friends on Twitter.

Login to Blogger. Go to Layout > EditHTML. Check Expand Widget Templates.

Copy and paste the following code where you want the widget to be displayed.


<a expr:href='"http://twitthis.com/twit?url=" + data:post.url + "&amp;title=" + data:post.title'>Twit This!</a>


CSS

If you like the TwitThis link () used in this blog, add this class in your CSS and use it with the above code.

.share-tweet {
background:url(http://bit.ly/PNzhb) 10px top no-repeat;
margin-left:10px;
padding-left:42px
font-size:11px;
line-height:18px;
}
Image

Del.icio.us bookmark button with counter for Blogger

You can add a del.icio.us bookmark button with counter which shows the number of users that share the current link for each post to your blog.

Login to Blogger. Go to Layout > EditHTML. Check Expand Widget Templates.

Find the portion of code given below.


<p class="post-footer-line post-footer-line-3">

Copy & Paste the code given below just below the above code.

<a expr:href='"http://del.icio.us/post?url="+ data:post.url + "&amp;title" + data:post.title' target='_blank'>add to del.icio.us</a>
saved by <span class='delsquare' expr:id='"a"+data:post.id'>0</span> users

<script type='text/javascript'>
function displayURL(data) {
var urlinfo = data[0];
if (!urlinfo.total_posts) return;
document.getElementById('a<data:post.id/>').innerHTML = urlinfo.total_posts;
}
</script>
<script expr:src = '"http://badges.del.icio.us/feeds/json/url/data?url= " + data:post.url + "&amp;callback=displayURL"'/>


CSS

Add this class in your CSS and use it with the above code.

.share-delicious{
margin-left:10px;
border-left:solid 1px #DEDEDE;
padding-left:36px;
font-size:11px;
line-height:18px;
float:left;
}

2009-05-05

Image

Image Opacity - Image Hover Effect To Blogge

This is one of the most common and popular image hover effects, you would have seen on many blogs, including a number of pro-blogs too. Simply hover your mouse cursor on these images:


The hack is very simple, a small CSS code changes the opacity level of the images, whenever you place the mouse cursor over these images.

To add this effect to the images in your blog, follow these steps;

STEP1:
Log in to Blogger, go to Layout -> Edit HTML,
Find (CTRL+F)

</head>

STEP2:
And right before that tag, paste this code:

<!--LINK-OPACITY-STARTS-->
<style type="text/css">


a.linkopacity img {
filter:alpha(opacity=50);
-moz-opacity: 0.5;
opacity: 0.5;
-khtml-opacity: 0.5;}


a.linkopacity:hover img {
filter:alpha(opacity=100);
-moz-opacity: 1.0;
opacity: 1.0;
-khtml-opacity: 1.0; }


</style>
<!--LINK-OPACITY-STOPS-http://3rb-game.blogspot.com/-->

STEP3:
Save the template.

STEP4:
Now whenever you want to show this effect to any of your images (whether in any post or in the sidebar), you have to modify the linking code like this:

Normally the code you use, to link any image will look like this:

<a href="http://3rb-game.blogspot.com/" target="_blank" alt="Blogger Help Templates Widget SEO Tips"><img src="http://www.gigaimage.com/images/rprt4ju7hysum6nkvbsv.png" /></a>

If you want to add the hover effect to the image, then add this simple code (in BOLD) to it, like this:

<a class="linkopacity" href="http://3rb-game.blogspot.com/" target="_blank" alt="Blogger Help Templates Widget SEO Tips"><img src="http://www.gigaimage.com/images/p70yhb40w1f8f45fna3.png" /></a>

You can leave the href="http://3rb-game.blogspot.com/" code in the above code, if you do not want to link the image to any url, but want to have this effect in it.


2009-05-04

Image

Add A Customized Related Posts Widget In Blogger

Related Posts Widget is one of the MUST-HAVE widgets in a blog.This serves as a helpful guide to readers for topics that may be related to the current post/entry.


How It Works.
Generally, the widget is based on Category or Label. Once the blog author labeled the post (regardless whether it's single or multiple labels), all posts that fall under such category will be seen in the Related Posts Widget.


Related Posts Widget Appearance.
The appearance may vary.

Some hacks show segregation of posts based on category; each category name is labeled for easy reference.

courtesy of:
3 Columns Blogger Template


On the other hand, other hacks show a combined list of related posts for a neater and more refined look. Like this one:
courtesy of:
Blogger Accessories


Customized Related Post Widget.
While the categorized Related Posts widget for multiple labels look orderly, some bloggers (like myself) prefer to have the related posts in one tidy list.

DCBlog has a fantastic hack on how to do this in his post - Hacking Related Posts. What's great about his hack is that the customization is fairly simple and the overall look is truly nice and pretty elegant. Below is an example of how it looks in my blog.

His hack is a combination of the following blogs' hacks:
SCRIPT: Related Posts Widget For Blogger With CSS
CSS: A blogger hack to show related posts before each blogger posts
BLOGGER CODE: How to show related posts/articles in blogspot blogs

To read more about this hack, check out DCBlog's Hacking Related Posts


How To Add Customized Related Post Widget in Blogger.
This one is based on DCBlog's Hacking Related Posts.


NOTE: BACKUP YOUR TEMPLATE!


(1) Go to Layout. Edit HTML.
(2) Before the closing tag of


]]></b:skin>

insert this CSS code from Bloganol.


/*-- related posts --*/


#related-posts {
float : left;
width : 450px;
margin-top:20px;
margin-left : 5px;
margin-bottom:20px;
font : 11px Verdana;
margin-bottom:10px; }


#related-posts .widget {
list-style-type : none;
margin : 5px 0 5px 0;
padding : 0; }


#related-posts .widget h2, #related-posts h2 {
color : #940f04;
font-size : 20px;
margin : 5px 7px 0;
padding : 0 0 5px; }


#related-posts a {
color : #1566a7;
font-size : 11px;
text-decoration : none;}


#related-posts a:hover {
color : #99cc00;
font-size : 16px;
font-weight: bold;
text-decoration : none; }


#related-posts ul {
border : medium none;
margin : 10px;
padding : 0; }


#related-posts ul li {
display : block;
background : url() no-repeat 0 0;
margin: 0;
padding-top : 0;
padding-right : 0;
padding-bottom : 0;
padding-left : 0;
margin-bottom : 5px;
line-height : 2em;
border-bottom:1px dotted #cccccc; }

For more tips on customizing this CSS, check out DCBlog's post..

(3) Before the closing tag of


</head>


add this script from Blogger Accessories


<script type='text/javascript'>
//<![CDATA[
var relatedTitles = new Array();
var relatedTitlesNum = 0;
var relatedUrls = new Array();
function related_results_labels(json) {
for (var i = 0; i < json.feed.entry.length; i++) {
var entry = json.feed.entry[i];
relatedTitles[relatedTitlesNum] = entry.title.$t;
for (var k = 0; k < entry.link.length; k++) {
if (entry.link[k].rel == 'alternate') {
relatedUrls[relatedTitlesNum] = entry.link[k].href;
relatedTitlesNum++;
break;
}
}
}
}
function removeRelatedDuplicates() {
var tmp = new Array(0);
var tmp2 = new Array(0);
for(var i = 0; i < relatedUrls.length; i++) {
if(!contains(tmp, relatedUrls[i])) {
tmp.length += 1;
tmp[tmp.length - 1] = relatedUrls[i];
tmp2.length += 1;
tmp2[tmp2.length - 1] = relatedTitles[i];
}
}
relatedTitles = tmp2;
relatedUrls = tmp;
}
function contains(a, e) {
for(var j = 0; j < a.length; j++) if (a[j]==e) return true;
return false;
}
function printRelatedLabels() {
var r = Math.floor((relatedTitles.length - 1) * Math.random());
var i = 0;
document.write('<ul>');
while (i < relatedTitles.length && i < 20) {
document.write('<li><a href="' + relatedUrls[r] + '">' + relatedTitles[r] + '</a></li>');
if (r < relatedTitles.length - 1) {
r++;
} else {
r = 0;
}
i++;
}
document.write('</ul>');
}
//]]>
</script>


(4) Search for this line of code:


<p><data:post.body/></p>


(5) Underneath this line, insert this blogger code from Realtrix


<b:if cond='data:blog.pageType == "item"'>
<div id="related-posts">
<font face='Arial' size='3'>
<b>Related Posts :</b>
</font>
<font color='#FFFFFF'>
<b:loop values='data:post.labels' var='label'><data:label.name/>
<b:if cond='data:label.isLast != "true"'>,</b:if>
<b:if cond='data:blog.pageType == "item"'>
<script expr:src='"/feeds/posts/default/-/" + data:label.name + "?alt=json-in-script&callback=related_results_labels&max-results=5"' type='text/javascript'/>
</b:if>
</b:loop>
</font>
<script type='text/javascript'> removeRelatedDuplicates(); printRelatedLabels();
</script>
</div>
</b:if>


The text "Related Posts" may customized:


<b>Related Posts :</b>


(6) Save Template.
(7) View Blog.

Here is the result:


Credits go to: Bloganol, Blogger Accessories, and Realtrix for creating wonderful hacks; DCBlog for putting them together to create another fantastic hack.


Blogs of Note that have Related Posts Widgets Hacks:
Jackbook
PurpleMoggy
Scrapur
Hoctro's Place
EverybodyGeek


2009-04-27

Image

Optimize your Blogger title for better SEO

Title’s and meta tag’s effect on serp is incredible , so what can wedo to improve serp and seo for blogger blogs? The codes below willdisplay the name of a particular entry without bringing the name of theblog in first position and this will affect our serp since titles areimportant for google spiders.Here’re the codes :
  • Goto Edit Html and find the codes below

    <title> <data:blog.pageTitle/> </ title>
And change with this

<b:if cond='data:blog.pageType ==&quot;item&quot;'> <title> <data:blog.pageName/>| <data:blog.title/> </title> <b:else/> <title><data:blog.pageTitle/> </title> </b:if>

and save .

2009-04-25

Image

Blogger RSS or email subscription form

 So what about the default Feedburner email subscription form in Blogger ?? It looks ugly right ?? . Now here you could use CSS to to create Beautiful email and RSS subscription form . An example of such a form is given here on my blog .

What you need is just to change the default code with this code .

&lt;a href=&quot;http://feeds2.feedburner.com/3rb-game&quot;&gt;&lt;img alt=&quot;feedburner&quot; style=&quot;border: 0pt none ; margin-top: 15px;&quot; src=&quot;http://i44.tinypic.com/o945yf.jpg&quot;/&gt;&lt;/a&gt;&lt;p&gt;&lt;strong&gt;&lt;span style=&quot;color:#ID9EDD;&quot;&gt;Subscribe for Email Updates&lt;/span&gt;&lt;/strong&gt;&lt;/p&gt;&lt;form action=&quot;http://www.feedburner.com/fb/a/emailverifySubmit?feedId=3rb-game&quot; http://www.feedburner.com/fb/a/emailverifysubmit?feedid=&quot;3rb-game&quot; , popupwindow\ );return true target=&quot;popupwindow&quot; id=&quot;subscribe&quot; onsubmit=&quot;window.open(\&quot; scrollbars=&quot;yes,width=550,height=520\&quot; style=&quot;border:1px solid #fff;padding:0px;text-align:left;&quot; method=&quot;post&quot; \&gt;&lt;img style=&quot;vertical-align:middle;border:0&quot; src=&quot;http://i35.tinypic.com/ifv98i.jpg&quot;/&gt;&amp;#160;&lt;input ;} enter email onfocus=&quot;if (this.value == &quot; value=&quot;Enter your email address...&quot; address... type=&quot;text&quot; id=&quot;subbox&quot; onblur=&quot;if (this.value == &quot; ) {this.value =  style=&quot;width:210px&quot; your name=&quot;email&quot;/&gt;
&lt;input value=&quot;http://www.feedburner.com/fb/a/emailverifySubmit?feedId=3rb-game&quot; name=&quot;url&quot; type=&quot;hidden&quot;/&gt;
&lt;input value=&quot;Subscribe To Feed&quot; name=&quot;title&quot; type=&quot;hidden&quot;/&gt;
&lt;input value=&quot;en_US&quot; name=&quot;loc&quot; type=&quot;hidden&quot;/&gt;
&lt;input id=&quot;subbutton&quot; value=&quot;GO&quot; type=&quot;submit&quot;/&gt;
&lt;/form&gt;
&lt;center&gt;&lt;a href=&quot;http://feeds2.feedburner.com/3rb-gamel&quot; target=&quot;_blank&quot;&gt;
&lt;img border=&quot;0&quot; width=&quot;88&quot; src=&quot;http://feeds2.feedburner.com/%7Efc/3rb-game?bg=99CCFF&amp;fg=444444&amp;anim=0&quot; height=&quot;26&quot;/&gt;
&lt;/a&gt;&lt;/center&gt;


Replace the the email subscription URL, feed URL

2009-04-20

Image

Add Automatic Read More Function To Blogger

Read more function is used to cut our post on homepage, post willappear fully when we click read more link. It's cut automatically andif we insert image, it appears thumbnail.
This is automatic read more function with thumbnail. We just need to set up our HTML code.

Follow steps:
1. Go to "Layout" click "Edit HTML"
2. Tick on "Expand Widget Templates"
3. Find this code
<data:post.body/>

4. Replace with this code below
<script type='text/javascript'>
summary_noimg = 430;
summary_img = 340;
img_thumb_height = 100;
img_thumb_width = 120;
</script>
<script src='http://kfile.110mb.com/summary-post.js' type='text/javascript'/>
<b:if cond='data:blog.pageType != &quot;item&quot;'>
<div expr:id='&quot;summary&quot; + data:post.id'><data:post.body/></div>
<script type='text/javascript'>createSummaryAndThumb(&quot;summary<data:post.id/>&quot;);</script>
<span class='rmlink' style='float:right'><a expr:href='data:post.url'>Read more</a></span>
</b:if>
<b:if cond='data:blog.pageType == &quot;item&quot;'><data:post.body/></b:if>
5. Replace JavaScript location to your site (http://kfile.110mb.com/summary-post.js)
6. Save / Check your blog

- If you need help to install it or to customize it, just leave a comment.
Image

Add Related Posts To Your Blogger Post

Now here is wonderful hack for displaying links to related postsbeneath each of your blog posts. The related articles are chosen fromother posts in that same category / label. With this hack many of yourreaders will remain on your site for longer periods of time when theysee related posts of interest.

How to install

1. Go to Layout --> Edit HTML in your Blogger Dashboard.

2. Back up your existing Template before making any changes!

3. Make sure to check the "Expand Widget Templates" box.

4. Search for the
</head>
tag.

5. Add the following code just before the
</head>
tag.


<style>
#related-posts {
margin:0; padding:10px;height:200px;overflow:auto;border:1px solid #ccc;
}
#related-posts .widget {
list-style-type : none;
margin : 5px 0 5px 0;
padding : 0;
}
#related-posts .widget h2, #related-posts h2 {
color : #940f04;
font-size : 20px;
font-weight : normal;
margin : 5px 7px 0;
padding : 0 0 5px;
}
#related-posts a {
color : #054474;
font-size : 11px;
text-decoration : none;
}
#related-posts a:hover {
color : #054474;
text-decoration : none;
}
#related-posts ul {
border : medium none;
margin : 10px;
padding : 0;
}
#related-posts ul li {
display : block;
background : url("http://i299.photobucket.com/albums/mm297/zozuglogger/weed-bullet.gif") no-repeat 0 0;
margin : 0;
padding-top : 0;
padding-right : 0;
padding-bottom : 1px;
padding-left : 16px;
margin-bottom : 5px;
line-height : 2em;
border-bottom:1px dotted #cccccc;
}
</style>
<script src='http://h1.ripway.com/amrmrx/Related_posts_hack.js' type='text/javascript'/>

6. Now search for
<p><data:post.body/></p>


7. Add the following code just beneath the code you just searched for.


8. Now Save your Template and you're done!

2009-04-19

Image

Add This Sexy Social Bookmarks Bottons


Good news for blogger.com users, now they can add the Sexy-bookmark wordpress plugin. by following these simple steps:

Now, Lets begin.
!Before changing your template, don't forget to backup your template and your widgets!

1. First of course go to your template editor and tick the 'Expand Widget Template'.

2. Put this code before </head>

<style type='text/css'>
div.sexy-bookmarks {
height:54px;
background:url('http://i43.tinypic.com/2ueii3t.png') no-repeat left bottom;
position:relative;
width:540px;
}
div.sexy-bookmarks span.sexy-rightside {
width:17px;
height:54px;
background:url('http://i43.tinypic.com/2ueii3t.png') no-repeat right bottom;
position:absolute;
right:-17px;
}
div.sexy-bookmarks ul.socials {
margin:0 !important;
padding:0 !important;
position:absolute;
bottom:0;
left:10px;
}
div.sexy-bookmarks ul.socials li {
display:inline-block !important;
float:left !important;
list-style-type:none !important;
margin:0 !important;
height:29px !important;
width:48px !important;
cursor:pointer !important;
padding:0 !important;
}
div.sexy-bookmarks ul.socials a {
display:block !important;
width:48px !important;
height:29px !important;
font-size:0 !important;
color:transparent !important;
}
.sexy-furl, .sexy-furl:hover, .sexy-digg, .sexy-digg:hover, .sexy-reddit, .sexy-reddit:hover, .sexy-stumble, .sexy-stumble:hover, .sexy-delicious, .sexy-delicious:hover, .sexy-yahoo, .sexy-yahoo:hover, .sexy-blinklist, .sexy-blinklist:hover, .sexy-technorati, .sexy-technorati:hover, .sexy-facebook, .sexy-facebook:hover, .sexy-twitter, .sexy-twitter:hover, .sexy-myspace, .sexy-myspace:hover, .sexy-mixx, .sexy-mixx:hover, .sexy-script-style, .sexy-script-style:hover, .sexy-designfloat, .sexy-designfloat:hover, .sexy-syndicate, .sexy-syndicate:hover, .sexy-email, .sexy-email:hover {
background:url('http://i44.tinypic.com/1znbj83.png') no-repeat !important;
}
.sexy-furl {
background-position:-300px top !important;
}
.sexy-furl:hover {
background-position:-300px bottom !important;
}
.sexy-digg {
background-position:-500px top !important;
}
.sexy-digg:hover {
background-position:-500px bottom !important;
}
.sexy-reddit {
background-position:-100px top !important;
}
.sexy-reddit:hover {
background-position:-100px bottom !important;
}
.sexy-stumble {
background-position:-50px top !important;
}
.sexy-stumble:hover {
background-position:-50px bottom !important;
}
.sexy-delicious {
background-position:left top !important;
}
.sexy-delicious:hover {
background-position:left bottom !important;
}
.sexy-yahoo {
background-position:-650px top !important;
}
.sexy-yahoo:hover {
background-position:-650px bottom !important;
}
.sexy-blinklist {
background-position:-600px top !important;
}
.sexy-blinklist:hover {
background-position:-600px bottom !important;
}
.sexy-technorati {
background-position:-700px top !important;
}
.sexy-technorati:hover {
background-position:-700px bottom !important;
}
.sexy-myspace {
background-position:-200px top !important;
}
.sexy-myspace:hover {
background-position:-200px bottom !important;
}
.sexy-twitter {
background-position:-350px top !important;
}
.sexy-twitter:hover {
background-position:-350px bottom !important;
}
.sexy-facebook {
background-position:-450px top !important;
}
.sexy-facebook:hover {
background-position:-450px bottom !important;
}
.sexy-mixx {
background-position:-250px top !important;
}
.sexy-mixx:hover {
background-position:-250px bottom !important;
}
.sexy-script-style {
background-position:-400px top !important;
}
.sexy-script-style:hover {
background-position:-400px bottom !important;
}
.sexy-designfloat {
background-position:-550px top !important;
}
.sexy-designfloat:hover {
background-position:-550px bottom !important;
}
.sexy-syndicate {
background-position:-150px top !important;
}
.sexy-syndicate:hover {
background-position:-150px bottom !important;
}
.sexy-email {
background-position:-753px top !important;
}
.sexy-email:hover {
background-position:-753px bottom !important;
}
</style>

3. Now Put the below code after <data:post.body/>

<div class='sexy-bookmarks'>
<ul class='socials'>
<li class='sexy-delicious'><a expr:href='&quot;http://del.icio.us/post?url=&quot; + data:post.url + &quot;&amp;title=&quot; + data:post.title' target='_blank'/></li>
<li class='sexy-digg'><a expr:href='&quot; http://digg.com/submit?url=&quot; + data:post.url + &quot;&amp;title=&quot; + data:post.title' target='_blank'/></li>
<li class='sexy-technorati'><a expr:href='&quot; http://technorati.com/faves?add=&quot; + data:post.url + &quot;&amp;title=&quot; + data:post.title' target='_blank'/></li>
<li class='sexy-reddit'><a expr:href='&quot; http://www.reddit.com/submit?url=&quot; + data:post.url + &quot;&amp;title=&quot; + data:post.title' target='_blank'/></li>
<li class='sexy-stumble'><a expr:href='&quot; http://www.stumbleupon.com/submit?url=&quot; + data:post.url + &quot;&amp;title=&quot; + data:post.title' target='_blank'/></li>
<li class='sexy-designfloat'><a expr:href='&quot;http://www.designfloat.com/submit.php?url=&quot; + data:post.url + &quot;&amp;title=&quot; + data:post.title' target='_blank'/></li>
<li class='sexy-facebook'><a expr:href='&quot; http://www.facebook.com/sharer.php?u=&quot; + data:post.url + &quot;&amp;title=&quot; + data:post.title' target='_blank'/></li>
<li class='sexy-twitter'><a expr:href='&quot; http://twitthis.com/twit?url=&quot; + data:post.url + &quot;&amp;title=&quot; + data:post.title' target='_blank'/></li>
<li class='sexy-furl'><a expr:href='&quot; http://www.furl.net/storeIt.jsp?u=&quot; + data:post.url + &quot;&amp;title=&quot; + data:post.title' target='_blank'/></li>
<li class='sexy-syndicate'><a href='http://feeds.feedburner.com/naeemnur' title='Subscribe to RSS'/></li>
<li class='sexy-email'><a expr:href='&quot; mailto:?subject=&quot; + data:post.url + &quot;&amp;title=&quot; + data:post.title' target='_blank'/></li>
</ul>
<span class='sexy-rightside'/></div>

Dont Forget to replace my feedburner id(naeemnur) with yours.

2009-04-17

Image

New Recent Comments Blogger Hack

Recent comments can be displayed in the sidebar of your Blog using the Feed page element. As a Feed-url you can provide "http://yourblogname/feeds/comments/full" to get the last 5 comments, with author and name. That's the standard functionality, and I really didn't like it at all. The standard comments-feed has a few things missing. First of all, the first few words of the comment are displayed as a link, but clicking the link brings you to the top of the post-item page in stead of to the comment itself. That is because of a bug in the link that is provided by Blogger. Second, I want to see on what post a person has commented. The feed doesn't provide for the post title, but we could obtain it from the link - and that is where this hack kicks in.

Our objective is to create a Recent Comments widget, that displays recent comments in the following format: "On [date & year] [author] commented on [post title]: [comment-summary] (more)".

Here is how you do it.

Step 1: Make a backup of your template.

Step 2: Add a standard recent comments widget to your Blog.
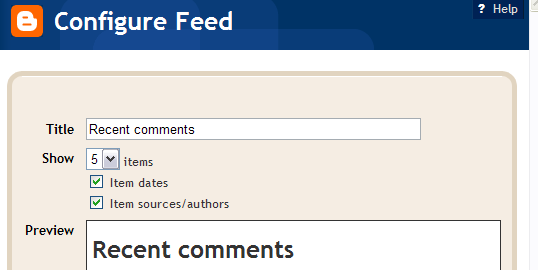
From the dashboard select your Blog and click Layout. Go to the Template tab and select Page Elements. In your sidebar add a Feed page element.
Enter your comment feed url.


Tick Item dates and Item sources on.


Save your template and view your Blog. You now have a standard recent comments widget.

Step 3: Add some javascript to the head of your template.
If you added my social bookmarking hack, you can skip this step.
If not, go to the Template tab, click Edit HTML, and add the following line of code to your templates head, just above the </head>-tag:

<script src='http://home.planet.nl/~hansoosting/downloads/beautifulbeta.js' type='text/javascript'/>

Save the template.

Step 4: Replace the widget coding
Go to the Template tab, and click Edit HTML. Now find your sidebar, and look for the new widget you just created. It will look something like this:


<b:widget id='Feed2' locked='false' title='Recent comments' type='Feed'/>

Now click Expand Widget Templates, and look for the widget. Use Ctrl-F to find it, using it's ID (in this example Feed2).
Replace the entire widget by the following code:


<b:widget id='Feed2' locked='false' title='Recent comments' type='Feed'>
<b:includable id='main'>
<h2><data:title/></h2>
<div class='widget-content'>
<ul expr:id='data:widget.instanceId + "_feedItemListDisplay"'>
<b:loop values='data:feedData.items' var='i'>
<li>
<b:if cond='data:showItemDate'>
<b:if cond='data:i.str_published != ""'>
<span class='item-date'>
On&#160;<data:i.str_published/>
</span>
</b:if>
</b:if>
<b:if cond='data:showItemAuthor'>
<b:if cond='data:i.author != ""'>
<span class='item-author'>
&#160;- <data:i.author/> commented on
</span>
</b:if>
</b:if>
<script type='text/javascript'>getPostTitle(&quot;<data:i.alternate.href/>&quot;)</script>&#160;:
<span class='item-title'>
<data:i.title/>&#160;<script type='text/javascript'>getCommentLink(&quot;<data:i.alternate.href/>&quot;)</script>
</span>
</li>
</b:loop>
</ul>
<b:include name='quickedit'/>
</div>
</b:includable>
</b:widget>

Save your template.

Your hack is implemented now.

Tech stuff.
I started with the standard-widget. First I canged the order of the <data>-elements to date, author, comment-summary. The comment-summary is represented by <data:i.title/>. In the standard widget, the comment summary is embedded in an anchor that links (or should link) to the comment. The consruction looks like this:


<a expr:href='data:i.alternate.href'><data:i.title/></a>

The link-address of the <data:i.alternate.href/>-field has the following format: "http://yourblog.blogspot.com/year/month/posttitle.html#number".
We will use this link to parse the posttitle from it, and to retrieve the correct comment-permalink. The correct permalink to the comment has the folowing format:
"http://yourblog.blogspot.com/year/month/posttitle.html#comment-number".

I wrote 2 js functions. The first function, getPostTitle, is handed the alternate.href, and writes the post title as a hyperlink to the post-item-page to the document. The second function, getCommentLink, is handed the alternate.href, builds the correct permalink, and displays it as a (more)-link.


Total Pageviews