2009-03-27

Image

How to add " Read more " to your blogger homepage posts ?

One good way of increasing your page views is to display summary of your posts and adding a read more link to the end of post summary so that viewers will navigate to the post page and read the complete article . In wordpress , it is quite easy to do that . But How will you do that in Blogger ? So , How to add " Read more " to your blogger homepage posts ?
Follow the steps below to add Read more to your blogger posts !!

  • Login to your Blogger dashboard and navigate as follows : Layout -- > Edit HTML .
  • Now select " Expand widget templates " by putting a tick on checkbox .
  • Click on Download full template and save your Template so that you can restore it if you find any problems .
  • Now find , <data:post.body> </data:post.body>and replace it with the following piece of code .

<b:if cond='data:blog.pageType != "item"'>
<div expr:id='"summary" + data:post.id'/>
<script type='text/javascript'>
var blogID = "Your Blog id";
function retriveSummaryPost<data:post.id/>(json){document.getElementById("summary<data:post.id/>").innerHTML
= json.entry.summary.$t + "..."}
function CreateSummaryTechnade<data:post.id/>(POSTID){ var script =
document.createElement("script");
script.src = "http://www.blogger.com/feeds/"+blogID+"/posts/summary/"+POSTID+"?alt=json-in-script&callback=retriveSummaryPost<data:post.id/>";
script.type = "text/javascript"; document.getElementsByTagName('head')[0].appendChild(script);
}
</script>
<script type='text/javascript'>
CreateSummaryTechnade<data:post.id/>("<data:post.id/>");
</script>
<span class='rmlink' style='float:right'><a expr:href='data:post.url'>-->Read more...</a></span>
</b:if>
<b:if cond='data:blog.pageType == "item"'>
<div id='post_body'><data:post.body/></div>
</b:if>

  • Now replace Your blog id in the above code with your blog 's id . Dont know how to get your blog ID ?? Its simple . Just see the URL of your page which will look something like this

    http://www.blogger.com/html?blogID=6813955933254343526&tpl=true

In the above URL letters in blog is the blog ID .

  • Save your template and you are done . Quite simple right ?
Image

How to add post comment form below your post in Blogger ?

Did you ever try to comment on Blogger ? You might had observed that Clicking on Add Comment link opens a annoying window which wont look like your blog . Its quite irritating for those who design and use custom templates in blogger . But I think now blogger is trying to close these kind of gaps as lot of people are moving to Wordpress when they really want to do some sort of pro blogging .

Blogger has introduced a new feature called add inline comment for showing a add comment form below your blogger post . So How to add inline comment feature to your blogger blog ?

  • Login to Blogger and navigate as shown in the figure . DashBoard --> Settings --> Comments .
  • Select " Embedded below post " in Comment form placement section in the page .
  • Now save your settings .
  • If you are using Blogger default template , you can see a comment form below your post as shown in the figure .

  • If you are using custom blogger template , you need to do some tweaking . Don't worry , its gonna be simple . So How to add comment form to Blogger Custom template ?
  • Navigate to Layout -- > Edit HTML . Check the option ' Expand widget Templates '.
  • Before you do anything , Backup your template by clicking download full template . Now search for the following piece of code . (if you don't check Expand widget templates , you can not find this ).

<p class='comment-footer'>
<a expr:href='data:post.addCommentUrl' expr:onclick='data:post.addCommentOnclick'><data:postCommentMsg/></a>
</p>

  • Replace the above piece of code with the code below .

<p class='comment-footer'>
<b:if cond='data:post.embedCommentForm'><b:include data='post' name='comment-form'/>
<b:else/><b:if cond='data:post.allowComments'>
<a expr:href='data:post.addCommentUrl' expr:onclick='data:post.addCommentOnclick'><data:postCommentMsg/></a>
</b:if></b:if>
</p>

  • Now Click on save Template and you are done . You can now see a comments form below your posts .
Image

How to add different Meta Tags to your blogger posts ?

for those who don't know about Meta Tags , let me introduce you What is a Meta tag ?
A meta tag is an element of HTML that often describes the contents of a Web page, and is placed near the beginning of the page's source code.Meta Tags are not displayed in the page . Search engines use information provided in meta tags to index pages by subject . Most common keywords are Description and Keywords .
Normally we add meta tags to the entire blog in Blogger so that search engines understand what we are writing about . But it will be better if you can add meta tags at the post level . So How to add different Meta Tags in your Blogger posts ?First I will tell you How to add meta Tags to your Blogger blog ?

  • Login to your Blogger account , and Navigate to Layout --> Edit HTML . Find the line below.

<b:include data='blog' name='all-head-content'/>

  • Now add the following piece of code below the above line and replace YOUR-BLOG-URL with your blog main page URL .

<b:if cond='data:blog.url == "http://YOUR-BLOG-URL/"'>
<meta content='DESCRIPTION' name='description'/>
<meta content='KEYWORDS' name='keywords'/>
</b:if>

  • With this you are done adding meta tags to your blog . Now we will add different tags to your Blogger posts . Add the following piece of code below the code which you added above and replace YOUR-BLOGPOST-URL with the specific URL of the post for which you want meta tags to be added .

<b:if cond='data:blog.url == "http://YOUR-BLOGPOST-URL"'>
<meta content='Type your post description here.' name='description'/>
<meta content='Type your post keywords here' name='keywords'/>
</b:if>

  • Repeat the above step for all posts to whom you want unique meta tags to be added and save your template .
Image

How to submit your Sitemap to Yahoo Site Explorer ?

We normally add our website sitemap to Google web master Tools so that it help Search engine bots to index our pages better . Many of us don't know that there is one such tool from another search engine giant , Yahoo i.e Yahoo Site Explorer . So , How to submit a website sitemap to Yahoo Site Explorer ?

  • Go to Yahoo Site Explorer and type your website URL in the Text box (First box in the picture ) and hit Explore URL .
  • If you see some results , your site has already been included , else you have to add it manually by entering your website URL in the My sites column (Second box in the figure ) .
  • If you are doing this after logging in Yahoo its ok or else Yahoo will prompt you to login .
  • Once you logged in , Click on your website link in the Mysites column
  • .
  • You will be taken to a summary page where your websites Authentication status , Homepage and number of feeds will be shown .
  • On the left side of this page , you can find a menu as shown in the figure. Click authentication in it .
  • Now you need to authenticate your URL by either uploading a file to your server or add a meta tag to your homepage .
  • Once you are done with it , Click on Ready to Authenticate . Your authentication status will be changed to pending . Yahoo will verify your website in 24 hours .
  • In the left side menu , you can see feeds option . Click on it and you can submit the feed of your blog in a text box which look like as shown in the figure .


  • Now wait for 2-3 days and you can see better results from Yahoo.
Image

How to Install Google Analytics on Blogger ?

Google Analytics Blogger LogoWouldn’t it be nice to know how many people actually visited your blog each day? How about knowing which of your posts are the most popular? Well surprisingly Blogger doesn’t currently offer any native blog analytics but fortunately there is Google Analytics — available for free.

Google Analytics is a great tool that will show you all sorts of useful information about how people found your blog, keywords they searched on to find you, where they came from and even how long they stayed. You’ll learn more about where your visitors come from and how they interact with your blog. This is a must tool if you are trying to build a profitable blog otherwise you are flying blind!

This article will show you how to add Google Analytics to your Blogger blog. It’s a fairly simple process and doesn’t require any technical skill at all.

Step #1 - Setup a Google Analytics Account

Go to Google Analytics and sign in using your Blogger login. If your account doesn’t work for some reason, you can create a new one instead. Once you login you’ll see a screen that looks like this:

Google Analytics Blogger Sign Up Step 1

Click on the “Sign Up >>” button and proceed to the next step which will ask you for your general information. Website URL, Account Name, Country, and Time Zone. The screen will look like this:

Google Analytics Blogger Step 2

If you noticed, I just put my Blogger url (without the http://) and called it “David’s Account” because this is your top-level container for 1 or 100 different websites so it’s a good idea to name it something more general. The next step will ask you for your contact information which includes your first name, last name, phone number, and country. Easy so far right? :-)

Google Analytics Blogger Step 3

Your last step in signing up will ask you to accept the user agreement terms and conditions which you should read (just kidding…who actually ever reads these entire legal terms anyhow?).

Google Analytics Blogger Step 4

Now this next screen is very important. This is the code you will need to copy and paste into your blogger template. Go ahead and click into the box and it will automatically highlight the entire block of code for you. Now you need to copy that code and paste it into notepad or into a MS Word document. Save it as you’ll need to use it later.

Google Analytics Blogger Step 5

After you click on the “continue >>” button you will be taken to your brand new Google Analytics dashboard! You will see your blogger blog listed but with no analytical data….yet.

Google Analytics Blogger Dashboard

Ok, now you are done with setting up your Google Analytics account. The next step is placing the tracking code into your Blogger template so it can report back to Google Analytics and provide you with some cool data points.

Step #2 - Adding GA Tracking Code to Your Blogger Template

This is not a very difficult step even if you are afraid to touch your template code. Login to your Blogger account and then click on the “Layout” => “Edit HTML” tabs. This will bring you to the template code. Before you make any changes, I advice you to back up your template just in case there are any problems. After you’ve done so, continue reading.

Now in the edit template html code window, scroll all the way to the bottom of your template code and look for the </body> tag. There should only be one of these closing tags in your template. If you can’t find it then your template wasn’t properly created and you should add one right above the </html> tag.The </html> tag should always be your last line of code in your template. It signifies the end of your template.

Ok, now go back to the code you saved before in a Word Doc from Google Analytics. You are going to copy it and paste it right above the </body> tag as illustrated in the image below. The yellow highlighted code is the new GA code I just pasted into my template.

blogger google analytics code 2

Save your template and you shouldn’t get any error messages. If you do, it’s most likely not related to this GA code and something else with your template itself. Assuming you’ve been successful with your save, you are all done embedding the GA code in your template!

Step #3 - Confirm Google Analytics is Tracking

Go back into your Google Analytics account and look at your dashboard. Most likely you will see a little yellow exclamation mark under the “status” column that looks like this: google analytics tracking not installed. This means everything isn’t working properly yet which is fine because we are about to tell GA we just added the code. From your dashboard, click on the “edit” link which is located to the far right.

Google Analytics Blogger Dashboard Edit

After you click on that link, you’ll see another screen like below. It will say “Tracking Not Installed” followed by a link “Check Status”. You’ll want to go ahead and click on that link which will tell GA to visit your site and look for the new code you just pasted in your template.

Google Analytics Blogger Dashboard Check Code

Assuming you pasted the code in there as instructed above, GA will find the new code and begin tracking everything on your blog. If you are still having problems, it’s most likely something to do with GA and you should read their help guide to troubleshoot your problem.

Google Analytics Blogger Dashboard Success

The message seen here, “Waiting for Data” means you have correctly setup GA and data is being gathered! Click on the top left Google Analytics logo and it will take you back to your dashboard. From there click on the “View report” link and that’s where all your very important Blogger visitor data will start appearing!

Google Analytics Blogger Dashboard Results

Now it usually takes an hour or so before you will see any data (maybe longer if you don’t get much traffic to your blog) so please be patient. Trust me, you’ll be logging in at least once a day just to see how much traffic your blog is getting. It’s very addicting and powerful information to learn from. You’ll be surprised which posts are your most popular and what countries people are coming from to read your blog.

Google Analytics is very powerful and we have just learned how to install it into your Blogger template. We haven’t even scratched the surface on the features and reporting it can do. For most Bloggers, this will be enough. Data will be collected and you will just review it. Others with more in-depth goals (like selling products or services, creating a sales funnel, etc) will want to spend more time learning GA. Hope you enjoyed the tutorial and don’t blame me for your new found addiction!

Ready to super charge your blog? Check out our professional premium blogger templates or make money by joining our blog affiliate program!

If you like this post then please consider subscribing to our eBlog Templates RSS feed. You can also subscribe by email and have new templates and articles sent directly to your inbox.

Image

Customizing your layout in your blogger

Your template is a fun way to customize your blog. When creating a new blog, you're first asked to choose a default template, this is the basic design of your blog. You can choose from customize your blog's design using our intuitive drag-and-drop interface. You can also add powerful gadgets such as slideshows, user polls, or even AdSense ads. Changing the fonts and colors on your blog is easy too. If you want more precise control over your blog's layout, you can also use the Edit HTML feature. To edit your blog's layout, follow these steps:

  1. Click the Layout link from your dashboard below the blog you would like to customize.
  2. From the Page Elements sub-tab, click Edit to edit existing gadgets, or Add a Gadget to add new ones.
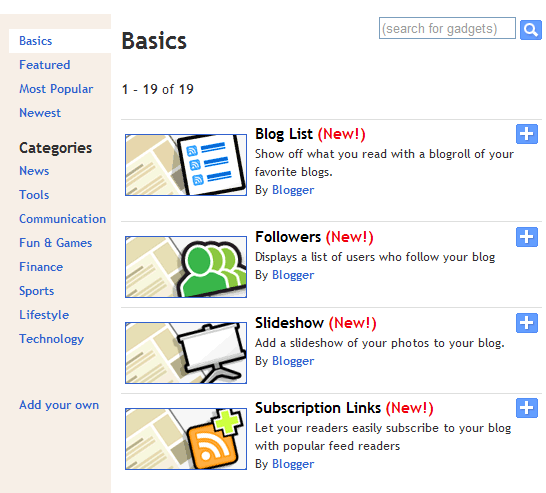
  3. To add a new gadget after you've clicked Add a Gadget, simply click the plus sign next to your desired gadget. You can choose from gadgets by category, or search for a specific gadget in the top right of the pop-up window.

    gadget list

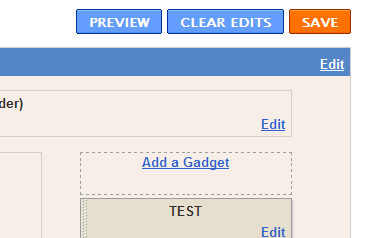
  4. Once you've added the necessary information to your selected gadget, click SAVE. Your layout changes will appear instantly.

    saving chnages to gadgets


thanx

Total Pageviews