Generally speaking, sitemap is
simply a map, showing all the pages and sub-pages of a website or a
blog, which is helpful both to visitors and search engines like Google, Yahoo etc.
For
visitors, sitemap (when displayed in HTML format), shows how the pages
and their subpages are interconnected, making it easier for them to
navigate around big websites.
And being a webmaster/blogger you must have a sitemap, as it's a search engine optimization tool, that hepls you to get more traffic through the search engines like Google and Yahoo.
Now
if you are a blogger, there is no direct method to simply upload an xml
or HTML sitemap file to your blog. So you can follow these steps to add a site map to your blogspot blog.
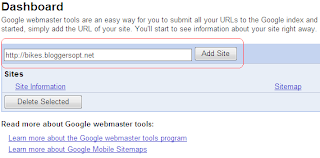
1. Go to Google Webmaster Tools website. [Here]
2. Login and then at the top (Add Site), type your blog's url :
3. Now you have to verify that you own that blog, so click on Verify your site, and select the "Add a Meta Tag" option.
Then copy the meta tag into your blog's "Edit HTML" section of "Layout" tab, and save the template.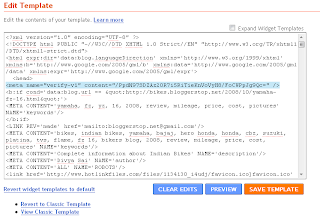
4. Then click on "Verify" at the bottom (in Google Webmaster account). So a message will be displayed:
5. Now click on Sitemaps link present at left side. Then click on "Add a Sitemap"
 You've successfully verified http://bikes.bloggerstop.net/.
6. In "Choose Type", select "Add General Web Sitemap"
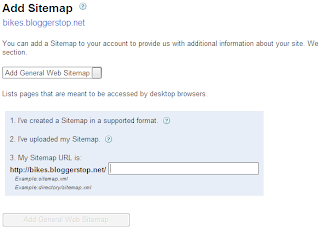
7. Then in the "My Sitemap url is" blank, type this:
atom.xml?redirect=false&start-index=1&max-results=100 (If you have up to 100 posts)
And if you have more than 100 articles or posts, then you have to add more sitemaps, after you have already added the previous one, like these:
atom.xml?redirect=false&start-index=101&max-results=100 (If you have up to 200 posts)
atom.xml?redirect=false&start-index=201&max-results=100 (If you have up to 300 posts)
atom.xml?redirect=false&start-index=301&max-results=100 (If you have up to 400 posts).

0 التعليقات: